


Many people think checking a motherboard is only for tech gurus, but that’s not true. Whether you’re experiencing computer issues or just curious about your hardware, you can learn how to check motherboard without needing a degree in computer science.
What is a Motherboard and Why It’s Important
The motherboard is the backbone of your computer. It connects all the components and ensures they work together seamlessly. Without it, your computer is just a collection of parts that can’t communicate.
Why You Might Need to Check Your Motherboard
Maybe your computer is acting up, and you’re not sure why. Perhaps you want to upgrade your system and need to check compatibility. Or, you might just want to know more about your computer’s health. Whatever the reason, knowing how to check your motherboard is a handy skill.
Overview of the Guide
In this guide, we’ll walk you through the steps to check your motherboard. We’ll start with the basics like identifying your motherboard model, then move on to checking its health and compatibility with other components.
Source: wikihow.com
Preparing for the Check
Before diving in, it’s crucial to prepare properly. This makes the process smoother and ensures you don’t damage your motherboard.
Gather Your Tools and Resources
First, gather the tools you’ll need. Most checks require simple tools like a screwdriver and a flashlight. For more advanced checks, you might need a multimeter or diagnostic software.
- Screwdriver: For opening your computer case.
- Flashlight: To see inside the case clearly.
- Multimeter: To test electrical connections (if needed).
- Diagnostic Software: Programs like CPU-Z or HWMonitor can provide detailed information about your motherboard.
Safety Precautions to Take
Safety first! Working inside your computer can be risky if you’re not careful. Here are some tips to keep in mind:
- Power Down: Always turn off and unplug your computer before opening the case.
- Ground Yourself: Use an anti-static wrist strap or touch a metal object to discharge static electricity.
- Handle with Care: Avoid touching the motherboard’s components directly to prevent static damage.
Now, you’re ready to start checking your motherboard. We’ll begin with identifying your motherboard model and move on to checking its health and compatibility.
How to Check Your Motherboard Model Number
A common misconception is that checking your motherboard model number is a tedious task requiring advanced technical knowledge. In reality, it’s quite simple and can be done in a few easy steps.
Using Windows System Information
One of the easiest ways to find your motherboard model is through the Windows System Information tool. Here’s how:
- Open the Start Menu and type “System Information”.
- Click on the System Information app.
- In the window that opens, look for “BaseBoard Manufacturer” and “BaseBoard Product”. These fields show the manufacturer and model of your motherboard.

Source: pcworld.com
Checking the Motherboard Physically
If you’re comfortable opening your computer case, you can find the model number directly on the motherboard. Here’s what to do:
- Turn off and unplug your computer.
- Open the case using a screwdriver.
- Locate the motherboard and look for the model number printed on it. It’s usually near the CPU socket or RAM slots.
Using Third-Party Software
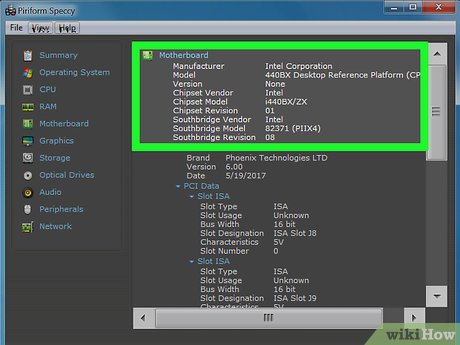
If you prefer not to open your case, several third-party software options can help. Programs like CPU-Z or Speccy provide detailed information about your computer, including the motherboard model.
- Download and install CPU-Z or Speccy.
- Run the program and navigate to the motherboard tab.
- Find the manufacturer and model number displayed in the software.
Verify Motherboard Status
Once you have the model number, you can verify your motherboard’s status by checking the manufacturer’s website. This will give you information about its specifications and any potential issues.
How to Check Motherboard Health in Windows 10
Many think that checking the health of a motherboard in Windows 10 is complex and time-consuming. However, with the right tools, it’s straightforward and essential for ensuring your system runs smoothly.
Built-in Windows Tools for Health Check
Windows 10 has several built-in tools that can help you check your motherboard’s health.
- Event Viewer: This tool logs system events and errors. Look for hardware errors that might indicate motherboard issues.
- Open the Start Menu and type “Event Viewer”.
- Navigate to Windows Logs > System to check for errors.
- Windows Memory Diagnostic: While primarily for RAM, this tool can help identify if motherboard issues are causing memory problems.
- Open the Start Menu and type “Windows Memory Diagnostic”.
- Follow the prompts to restart and check for issues.
Third-Party Software Recommendations
For a more comprehensive check, third-party software like HWMonitor or AIDA64 can be invaluable. These programs provide detailed information about your motherboard’s health, including temperature, voltage, and fan speeds.
- Download and install HWMonitor or AIDA64.
- Run the program and navigate to the motherboard section.
- Check the readings for any anomalies in temperature, voltage, or fan speed.
Interpreting the Results
Once you have the data, it’s crucial to understand what it means. Your motherboard should not exceed certain temperature limits, usually around 85°C. High temperatures can indicate cooling issues that need addressing. Voltage readings should be within the specified range; fluctuations might suggest power supply problems. Ensure fans are running at appropriate speeds, as slow or non-functional fans can lead to overheating. If any readings are outside the normal ranges, it’s important to investigate further and potentially replace faulty components.
- Temperature: Your motherboard should not exceed a certain temperature (usually around 85°C). High temperatures can indicate cooling issues.
- Voltage: Voltage readings should be within the specified range. Fluctuations can indicate power supply problems.
- Fan Speeds: Ensure fans are running at the appropriate speeds. Slow or non-functional fans can lead to overheating.
By following these steps, you can easily check the model and health of your motherboard, ensuring your system remains in top condition. Stay tuned for the next sections where we’ll dive into compatibility and more advanced checks!
Pros: Provides actionable insights to maintain motherboard health. Helps in early detection of potential issues. Cons: Requires some technical understanding to interpret results correctly.
Final Verdict
Checking your motherboard’s health is crucial for maintaining overall system performance and longevity. Windows 10’s built-in tools are a good starting point for basic diagnostics, while third-party software like HWMonitor and AIDA64 offer more detailed insights. Regular monitoring and understanding the data can help you address issues before they become serious problems. For most users, a combination of built-in tools and third-party software provides a balanced approach to maintaining motherboard health.
FAQs
Q: Do I need to be a tech expert to check my motherboard?
No, you don’t need to be a tech expert. Checking your motherboard is simpler than you think. With basic tools and the right guidance, anyone can do it.
Q: How can I find my motherboard model number without opening my computer?
You can use the Windows System Information tool or third-party software like CPU-Z or Speccy. These programs provide detailed information about your motherboard without the need to open your computer case.
Q: What should I do if my motherboard temperatures are too high?
If your motherboard temperatures are too high, ensure your computer’s cooling system is working properly. Check the fans, clean any dust, and consider reapplying thermal paste if necessary. In some cases, adding additional cooling fans or improving airflow can help.
Q: How often should I check my motherboard’s health?
It’s a good idea to check your motherboard’s health every few months or whenever you notice performance issues. Regular checks can help you catch potential problems early and keep your system running smoothly.
Q: Can I use the same tools to check other components in my computer?
Yes, many tools used to check your motherboard can also help diagnose issues with other components like the CPU, RAM, and power supply. Programs like HWMonitor and AIDA64 provide comprehensive diagnostics for your entire system.
Q: What are the signs that my motherboard might be failing?
Common signs of a failing motherboard include random shutdowns, failure to boot, unusual noises, overheating, and blue screen errors. If you notice any of these issues, it’s important to check your motherboard and other components.
Q: Is it safe to open my computer case to check the motherboard?
Yes, it’s safe as long as you take proper precautions. Always turn off and unplug your computer before opening the case. Ground yourself to prevent static discharge, and handle components with care.
Q: Can third-party software harm my computer?
Reputable third-party software like CPU-Z, Speccy, HWMonitor, and AIDA64 is safe to use and won’t harm your computer. Always download software from trusted sources to avoid malware.
Q: Why should I update my motherboard’s BIOS?
Updating your BIOS can improve system stability, compatibility, and performance. It can also fix bugs and add new features. Check the manufacturer’s website for updates and follow their instructions carefully.
Q: What should I do if I find faulty capacitors on my motherboard?
If you find faulty capacitors, you can try to replace them if you have the skills. However, it might be safer to take your motherboard to a professional for repair. In some cases, it might be more cost-effective to replace the motherboard.
Q: Can I still check my motherboard if my computer won’t boot?
Yes, you can still check your motherboard if your computer won’t boot. Physically inspect the motherboard for damage, use a multimeter to test power connections, and try using minimal components to diagnose the issue.
Q: What’s the best way to keep my motherboard in good health?
Regular cleaning, ensuring proper cooling, updating BIOS and drivers, and monitoring system performance are key to keeping your motherboard in good health. Avoid overclocking unless you have adequate cooling solutions.


