


Unlocking the Secrets of DRAM Light on Motherboard: What It Really Means
Have you ever glanced at your computer’s motherboard and noticed a mysterious light glowing? Many people assume that a DRAM light on a motherboard is a sign of a major problem, like a failing component. However, the truth behind these lights is more nuanced than you might think.
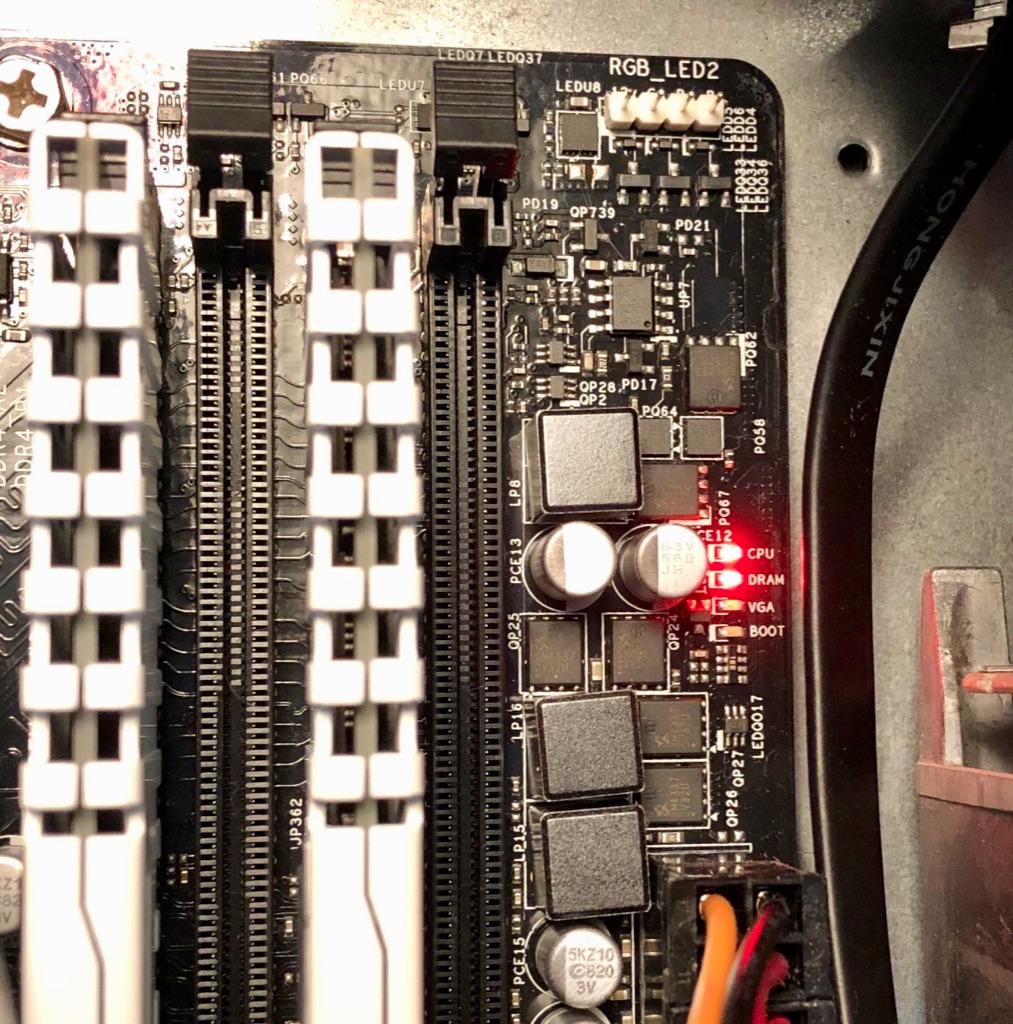
What is DRAM Light on Motherboard?
When you see a dram light on motherboard, it’s not necessarily a cause for panic. In fact, DRAM (Dynamic Random Access Memory) lights are designed to provide users with important feedback about their system’s memory status. These lights typically indicate the operational state of your RAM modules, helping you identify potential issues affecting your computer’s performance.

Source: i.pinimg.com
Understanding the Significance of DRAM Light
The colors and patterns of dram light on motherboard can convey valuable information. For instance, a solid red light might suggest a RAM module failure, while a blinking green light could indicate that the memory is being accessed. Different motherboard manufacturers use varying methods to display these lights, so it’s essential to consult your motherboard’s manual for specific details.
Decoding DRAM Light Colors
DRAM lights come in various colors, each representing a specific status:
- Red: Typically signifies a critical error with the RAM module or a related component.
- Green: Indicates that the RAM is functioning correctly and data is being accessed.
- Orange/Yellow: Can signal a warning or a less severe issue that requires attention.
Interpreting DRAM Light Patterns
In addition to colors, the patterns of dram light on motherboard can offer valuable insights:
- Solid: Indicates a persistent state, such as an error condition.
- Blinking/Flickering: Often shows activity or ongoing processes within the RAM.
Common Misconceptions About DRAM Light
One common misconception is that any DRAM light automatically indicates a serious problem like a faulty RAM module. However, DRAM lights are part of a comprehensive diagnostic system that aims to empower users to diagnose and resolve issues efficiently.
Common Reasons Behind DRAM Light Issues
Despite the initial alarm that a dram light on motherboard might cause, these indicators often point to specific issues that can be resolved with some troubleshooting. Let’s explore some of the common reasons why you might encounter dram light on motherboard activation:
1. Faulty RAM Modules
One of the primary reasons for a dram light on motherboard to illuminate is a faulty RAM module. Over time, RAM modules can degrade or become defective due to various factors like heat or electrical issues. If you suspect a faulty RAM module, try reseating or replacing it to see if the DRAM light issue resolves.
2. Incompatible RAM Configuration
Sometimes, dram light on motherboard can activate if the installed RAM modules are incompatible with your motherboard or with each other. Check your motherboard’s specifications to ensure that the RAM modules you’re using are supported and correctly configured.
3. Motherboard Issues
Issues with the motherboard itself, such as damaged RAM slots or faulty components, can also trigger dram light on motherboard. Inspect the motherboard for physical damage or consult with a professional technician to diagnose and address potential motherboard-related issues.
4. Overclocking or XMP Profiles
If you’ve overclocked your RAM or enabled XMP (Extreme Memory Profile) settings in the BIOS, this can sometimes lead to instability and trigger dram light on motherboard. Try reverting to default settings to see if the issue resolves.
5. Power Supply Problems
Insufficient power supply or voltage fluctuations can impact the stability of your system’s components, including the RAM. Ensure that your power supply unit (PSU) is adequate for your system’s requirements and check for any power-related issues.
Source: superuser.com
Troubleshooting DRAM Light Issues
Now that we’ve identified some common causes of dram light on motherboard activation, let’s move on to troubleshooting these issues effectively in the next section of this blog post. By understanding the underlying reasons behind dram light on motherboard problems, you’ll be better equipped to diagnose and resolve them without unnecessary stress.
Troubleshooting DRAM Light on Motherboard
Encountering a dram light on motherboard can be disconcerting, but fear not! With the right troubleshooting techniques, you can resolve DRAM light issues effectively and get your system back up and running smoothly.
1. Check RAM Module Connections
Begin by powering down your system and ensuring that all RAM modules are securely seated in their respective slots. Sometimes, a loose connection can trigger DRAM light activation. Gently reseat the RAM modules and see if the issue persists.
2. Test Each RAM Module Individually
To identify whether a specific RAM module is causing the issue, try testing each module individually. Remove all but one RAM module and boot up your system. If the DRAM light remains off, gradually reintroduce each module to isolate the problematic one.
3. Verify Compatibility and Configuration
Consult your motherboard’s manual to confirm that your RAM modules are compatible and correctly configured. Ensure that they are installed in the recommended slots and that the BIOS settings align with the specifications of your RAM.
4. Reset BIOS Settings
Resetting your BIOS to default settings can sometimes resolve DRAM light issues caused by overclocking or incompatible configurations. Access the BIOS menu during startup (usually by pressing Del or F2) and look for the option to reset to default settings.
5. Update Motherboard Firmware
Outdated motherboard firmware can contribute to compatibility issues and trigger DRAM lights. Visit the manufacturer’s website to download and install the latest firmware updates for your motherboard.
6. Test with Known Good RAM
If available, substitute your current RAM modules with known good ones to rule out faulty RAM as the cause of DRAM light activation. This can help pinpoint whether the issue lies with the RAM modules themselves.
7. Consult Professional Assistance
If you’ve exhausted these troubleshooting steps and the DRAM light issue persists, it may be time to seek professional assistance. A qualified technician can diagnose complex motherboard-related issues and provide tailored solutions.
Troubleshooting DRAM Light on Motherboard: In-Depth Analysis
Encountering a DRAM light on your motherboard can be a perplexing experience, but fear not! Let’s delve deeper into troubleshooting techniques to address DRAM light issues effectively and restore optimal performance to your system.
Understanding DRAM Light Features
DRAM lights on motherboards serve as vital diagnostic indicators, providing real-time feedback about the status of your system’s memory. These lights come in various colors and patterns, each with its own significance:
- Red Light: Often indicates a critical error or faulty RAM module that requires immediate attention.
- Green Light: Signals that the RAM is functioning correctly and actively processing data.
- Orange/Yellow Light: Serves as a warning, highlighting potential issues that need further investigation.
Pros of Troubleshooting DRAM Light Issues
The process of troubleshooting DRAM light problems offers several advantages:
- Identifying Root Causes: By systematically diagnosing DRAM light activations, users can pinpoint underlying issues affecting system performance.
- Cost-Effective Solutions: Resolving DRAM light issues through troubleshooting can often save money compared to replacing hardware prematurely.
- Improved System Stability: Addressing DRAM light problems enhances overall system stability, reducing the risk of unexpected crashes or malfunctions.
Cons of Troubleshooting DRAM Light Issues
However, troubleshooting DRAM light issues may present some challenges:
- Complexity: Diagnosing DRAM light problems requires a certain level of technical knowledge and familiarity with motherboard components.
- Time-Consuming: Troubleshooting can be a time-intensive process, especially when testing individual RAM modules or adjusting BIOS settings.
- Potential for Hardware Damage: Incorrect troubleshooting procedures may inadvertently cause hardware damage if not executed carefully.
Final Verdict: Resolving DRAM Light Issues
In conclusion, while encountering a DRAM light on your motherboard can be unsettling, addressing these issues through systematic troubleshooting is essential for maintaining optimal system performance. By understanding the features of DRAM lights, weighing the pros and cons of troubleshooting, and approaching the process with diligence, users can effectively diagnose and resolve DRAM light problems with confidence.
FAQs About Troubleshooting DRAM Light on Motherboard
Q1: What does a DRAM light on my motherboard indicate?
A DRAM light typically indicates the status of your system’s RAM (Random Access Memory). Different colors and patterns of DRAM lights convey specific information about memory functionality, such as errors, activity, or warnings.
Q2: How can I tell if my RAM module is faulty?
If you suspect a faulty RAM module, try reseating it first to ensure a secure connection. You can also test each RAM module individually by removing all but one and booting up your system. If the DRAM light issue persists with a specific module, it may be faulty and require replacement.
Q3: Why is it important to troubleshoot DRAM light issues promptly?
Resolving DRAM light issues promptly is crucial to maintaining system stability and preventing potential hardware failures. Ignoring DRAM light indicators could lead to worsening performance or system instability over time.
Q4: What should I do if I encounter a solid red DRAM light?
A solid red DRAM light typically indicates a critical error, such as a faulty RAM module or incompatible configuration. Start by reseating the RAM and verifying compatibility. If the issue persists, consult your motherboard’s manual or seek professional assistance.
Q5: Can overclocking or XMP profiles trigger DRAM light issues?
Yes, overclocking your RAM or enabling XMP (Extreme Memory Profile) settings in the BIOS can sometimes lead to instability and trigger DRAM light activation. Consider reverting to default settings to see if the issue resolves.
Q6: How do I update my motherboard’s firmware?
To update your motherboard’s firmware, visit the manufacturer’s website and locate the latest firmware version for your specific model. Follow the provided instructions for downloading and installing the firmware update carefully to avoid any potential issues.
Q7: When should I seek professional assistance for DRAM light problems?
If you’ve exhausted troubleshooting steps and the DRAM light issue persists, or if you suspect underlying motherboard-related issues, it’s advisable to seek professional assistance from a qualified technician. They can provide tailored solutions and diagnose complex hardware problems effectively.


